I worked on this case study as part of my Professional Diploma at Glasgow Caledonian University and UXDesign institute.
This project is to design a new website for a start-up airline, they was looking to create an online experience that is fast, easy, and intuitive ,base on the research and a deep understanding of their target users. The focus was specifically on the flight booking process : How users search for and select flights online. My end goal is to design a flight booking process that can be done in the minimum amount of time and built a high fidelity prototype that can be tested with users with a detailed set of wireframes. To do this I went through the full UX process. A journey through research, analysis, design, prototyping and wireframing.
UX is research-based discipline.research is the first step to problem solving. Competitive benchmarking is a research technique that I used, to look at how best-in-class websites solve the same problems, the conventions I should follow and the best practice that I should emulate. I reviewed and compared the flight booking process for 4 websites. I've highlighted components that stood out as being poor areas that could be improved and the conventions that could be emulated.
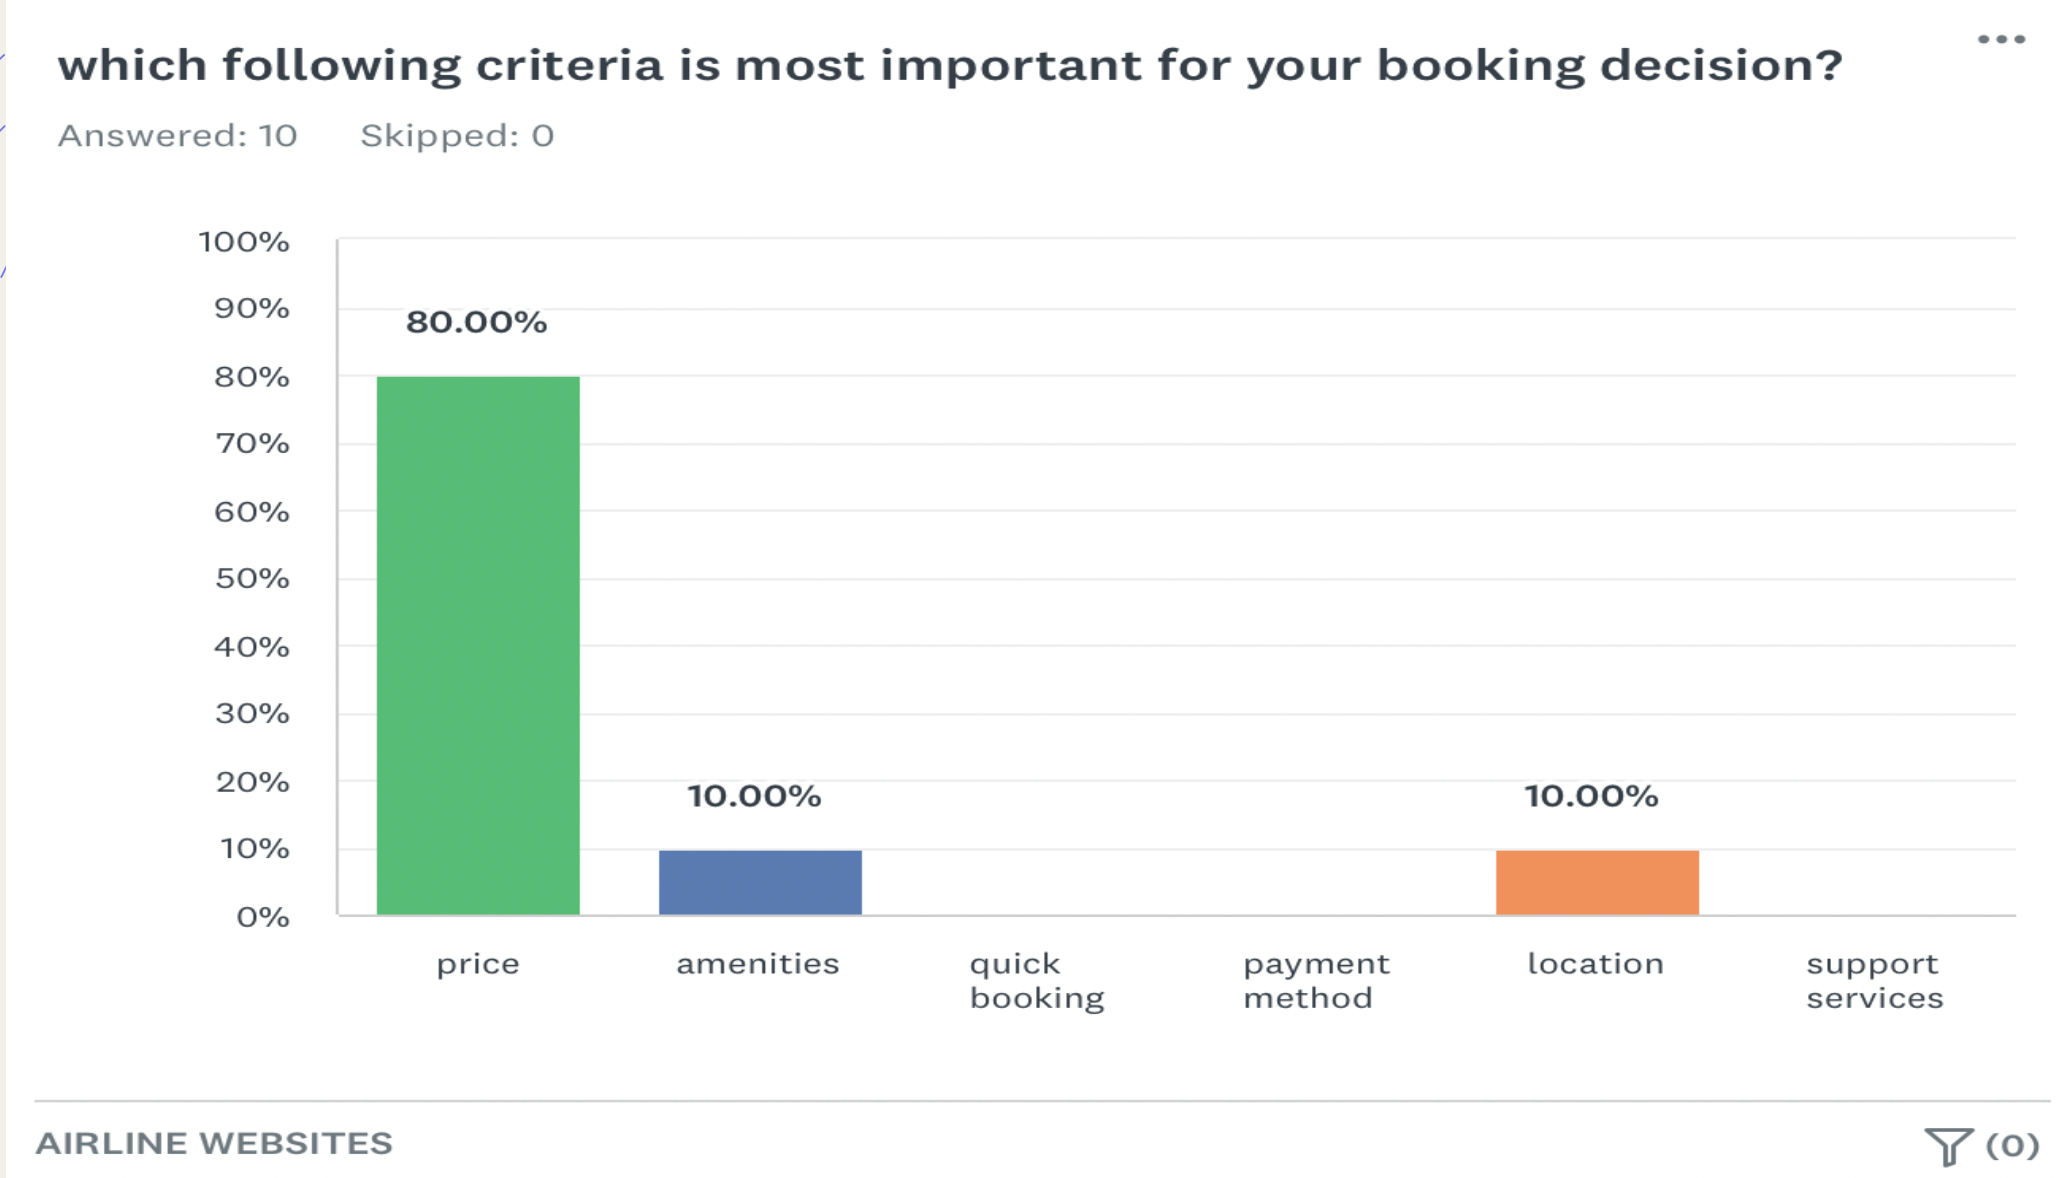
In order to get a good understading of what the users expect and identifying their goals and pain points, I used this research technique that is mixture of quantitative and qualitative questions. Then gathered the data that could help me make more informed design decisions. I've chosen Survey monkey tool and created an online survey. I asked my friends to participate this survey, but on real world projects, I would need to gather more responses to get statistically valid data.
This project is a skill, in order to get good understanding and highlighting the key insights from the usability test sessions. The Course provided two usability test recording that are related to my case study. I aimed to focus on the goals, behaviours, context, positive interactions and pain points for each participant.
Because of I was going to design a new website that doesn't exist yet, and needed to be built, So I used the competitor's products for my usability test session. I asked my friend to attend to this session. He was given a set task for booking a flight in two different websites. In this project I did setting up, moderating and recording usability test, In order to gain rich insights directly from the user. Focusing on what is user trying to do, focusing on the goals and behaviours and learning how to conduct depth interview. I used Screenflow for recording this session.
The next step of UX process is to gather and sort trough large volume of qualitative data from all research technique that I used. In fact, I should used triangulation method to get the root of our finding. I reviewed all the researches and created an affinity diagram to represent what I gained so far. I used Miro to created sticky notes and organising them into logical groups, so that I could make improvements to the success of my software.
It was the starting point to design. My overall objective was to fix the issues which were highlighted in affinity diagram and customer journey map. I defined a high level flow for my new website, focused on one flow that in one primary use case to ensure how users will flow through my design. I sketched screens and screen states, the flow from homepage to payment screen, on paper then I recreated it in digital format using Miro.
After determining the user flow, it was time to start sketching and designing screens and screen states. It was time to get into solution mode. My goal was to address all the issues and the user goals identified. A list of screens based on my flow diagram and on the user actions. I made notes some issues in order to become apparent. I used pen & paper that are the best for implementation the ideas, based on the user goals, behaviours and pain points with the aim of solving them.
It was time to jump into Figma, start designing screens and create a prototype for my desktop app. Adding more detail in the form of interactivity to test high level flow. At first, I made the prototype, then rechecked my data, I had to make some changes in it. After I reached my desired model, I tested it with a user in one session, and fixed the minor defects. I wanted to create a high- fidelity prototype that would be as close to the finished product as possible, which could be tested with users with real experience of booking flight in minimum amount of time with the least friction and be easy, fast and intuitive.
The final stage of the UX process, creating a set of annotations and defining the extra details that contain all necessary data, so that developers would need to build the product accurately. I'v tried that these annotations include all the information that defines : how the system would behaves, how it would responds to actions, how it would communicates results and how it would help fulfil intentions. Finally,the prototype and annotated wireframes along with user flow and information architecture will be handover to the developers.
Well done on a great prototype, it contains enough detail to test the high level flow, the screen layouts and interactions.The prototype is well considered, with many good details considering every step along the journey. It is clear that a lot of time and effort has gone into this and it has paid off! Nice work on the wireframes as well, this document contains all the information the developer would need to build the booking process accurately.
Student Success Team
Let's work together!
For the job opportunities, please fill out the contact form below. I'm very interested in to hear from you.
Thank you! Your submission has been received!
Oops! Something went wrong while submitting the form.